So, you’ve just received a beautiful canvas print or are planning to decorate your wall with custom art – but now you're wondering: How do I hang my canvas wall art properly without damaging the wall or making it crooked?
Don’t worry! This step-by-step guide will show you exactly how to use the included canvas hanging kit, what tools you need, and the safest, easiest ways to hang your art at home.
What's Included in Our Standard Hanging Kit?
Every canvas wall art order from our shop includes a basic hanging kit that makes installation easy:
-
2 Metal D-rings – Attach to the back of your canvas frame
-
2 Screws – Used to fasten the D-rings
-
2 Wall Hooks or Nails – Mount into your wall to hang the art
👉 This kit is beginner-friendly and works with most surfaces like drywall, wood, or plaster walls – no power tools required!

What Additional Tools You'll Need
To ensure smooth installation, we recommend you prepare the following common household tools:
| Tool | Purpose |
|---|---|
| Small Hammer | To tap nails or wall hooks into place |
| Screwdriver | To attach D-rings onto the canvas frame |
| Pencil | To mark hanging points on the wall |
| Measuring Tape | To measure height and spacing |
| Level (optional) | To ensure your canvas hangs straight |
| Adhesive Hooks (optional) | Ideal for rentals or tiled walls where nails aren't allowed |
Step-by-Step: How to Hang Your Canvas Wall Art
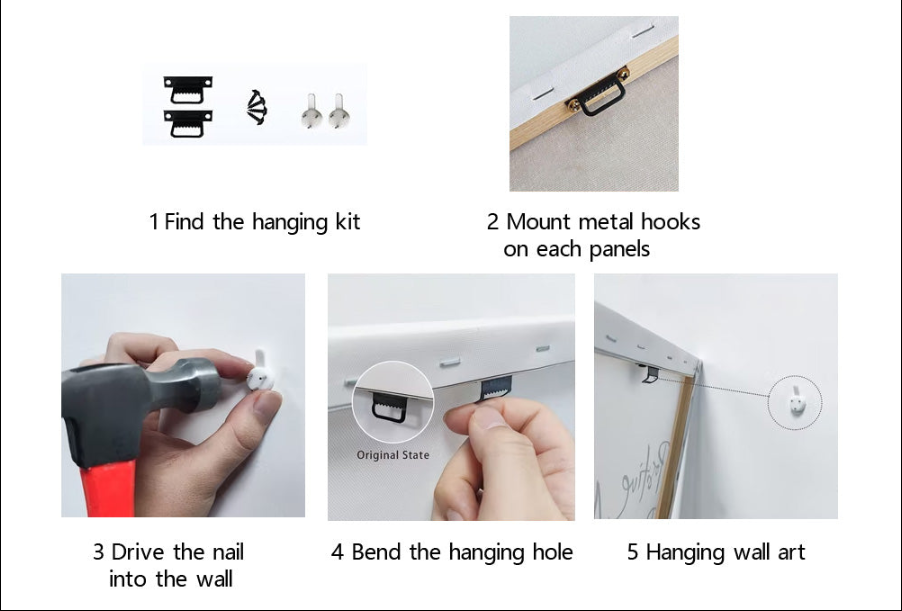
✅ Step 1: Check Your Hanging Kit
Make sure all components (hooks, screws, D-rings) are included in the package. If anything’s missing, contact our support team for a replacement.
✅ Step 2: Attach D-Rings to the Back of the Canvas
-
Lay your canvas face-down on a flat surface.
-
Position each D-ring on both sides of the upper back frame, around 2–3 inches from the top.
-
Use a screwdriver to fasten the screws into the wood securely.
Tip: Align both D-rings at the same height for a balanced hanging.
✅ Step 3: Choose and Mark the Wall Position
-
Hold the canvas against your wall and visualize where you want it.
-
Mark the top center or where the D-rings will hang using a pencil.
-
For multi-panel art, lay the pieces out on the floor first, then measure spacing.
✅ Step 4: Install Wall Hooks or Nails
-
Position your nail or hook on the pencil mark.
-
Gently hammer it in – make sure it’s flush and secure.
-
Repeat for the second hook, measuring to keep both aligned.
⚠️ For hard walls (concrete or tile), consider using heavy-duty adhesive hooks or wall anchors.
✅ Step 5: Hang the Canvas
-
Line up the D-rings with the wall hooks.
-
Gently hang the artwork, adjusting slightly to center it.
-
Use a level to ensure it’s straight.
Extra Tips for a Picture-Perfect Look
-
Ideal height: Hang artwork so the center is about 57–63 inches from the floor – close to average eye level.
-
Use a level: Especially important for large or multi-panel canvas sets.
-
Leave spacing: When hanging multiple pieces, leave 1–2 inches between each for balance.
-
Avoid direct sunlight: Helps prevent fading or warping of the canvas.
-
Avoid moisture-prone walls: Protects the wooden frame and keeps your canvas in shape.
❓ FAQs: Common Wall Art Hanging Questions
Q1: My wall is too hard – the nails won't go in!
A: Try using a power drill and wall plugs, or switch to strong adhesive hooks designed for smooth surfaces.
Q2: I’m renting – can I hang the art without drilling?
A: Yes! Use removable damage-free adhesive hooks. They’re perfect for temporary installations.
Q3: My uploaded photo is low resolution – can it still be printed?
A: We always check image resolution before printing. If it’s too low, we’ll email you first and offer a free resolution enhancement service. We want your print to look perfect!
Every Wall Deserves Great Art
With just a few simple tools and this guide, anyone can hang wall art like a pro – no experience needed. Whether you’re decorating your bedroom, hallway, or office, the right canvas art can completely transform a room. Don’t be afraid to experiment, measure carefully, and enjoy the creative process!
Share:
How to Print Low Resolution Photos Without Losing Quality
How to Prepare the Right Resolution for Printing Canvas Wall Art?